5 Smart Roof Leak Fix Guide Basics for Beginners
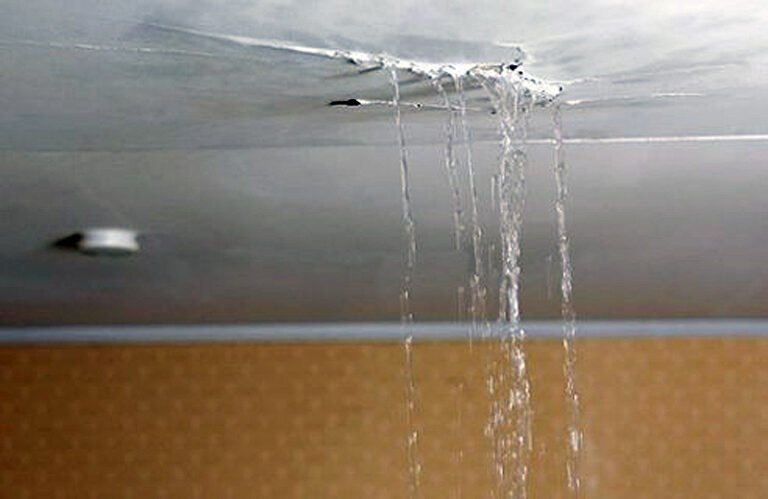
If you’ve ever heard that steady plop-plop-plop sound in the middle of the night during a downpour or noticed a suspicious brown stain spreading across your bedroom ceiling, you already know the sinking feeling a roof leak brings. I remember the first time it happened to me years ago in my starter home out in the suburbs. It was just a small drip at first, nothing dramatic, but by morning the ceiling was sagging and I was scrambling with buckets and old towels like some kind of amateur firefighter. That experience taught me a lot about how these problems sneak up on you and how fixing them doesn’t have to mean calling in a crew right away if you’re willing to learn a few basics.
The good news is that most roof leaks start small and can be handled by beginners like us if we approach them smartly. We’re talking about everyday homeowners here, not roofers with decades of experience or fancy equipment. The trick is to focus on prevention where possible, quick action when water shows up, and smart choices that save you money without cutting corners on safety. A leaking roof isn’t just annoying. It can lead to thousands in water damage, ruined insulation, mold growth that messes with your family’s health, and even structural issues if you ignore it long enough. But with the right mindset and a handful of accessible techniques, you can stop most leaks in their tracks and keep your home dry for years.
What makes these fixes “smart” isn’t some high-tech gadget or secret formula. It’s about working smarter, not harder. That means tracing the water to its real source instead of patching blindly, using materials that actually last in your climate, staying safe so you don’t end up in the emergency room, and building habits that prevent the next leak before it starts. Over the years I’ve patched asphalt shingle roofs, dealt with metal flashing problems, and even handled a tile roof on a vacation rental I once owned. The principles stay pretty much the same no matter the material.
In this guide we’ll walk through five core basics that cover the entire process from detection to long-term protection. These aren’t rushed tips you’ll forget tomorrow. Each one builds on the last, with step-by-step details, common pitfalls I’ve seen (and sometimes made myself), real-world examples from regular homes like yours, and practical advice on tools and materials you can pick up at any big-box store. We’ll keep costs in mind too because nobody wants to blow the budget on a repair that should cost under a hundred bucks if done right.
By the end you’ll feel confident enough to handle minor leaks on your own while knowing exactly when it’s time to bring in a pro. Let’s get into it without any fluff. The first thing every beginner needs is a clear head and a plan, so we’ll start right there.
The first smart basic is all about becoming a leak detective instead of guessing where the water is coming from. Most people make the mistake of climbing onto the roof right away and slapping sealant on the wet spot they see from the ground. That almost never works because water is sneaky. It can travel sideways, downhill, or even uphill under shingles for several feet before it finally drips into your attic or ceiling. I learned this the hard way when I patched a spot directly above a ceiling stain only to find the real problem was three feet away near a vent pipe.
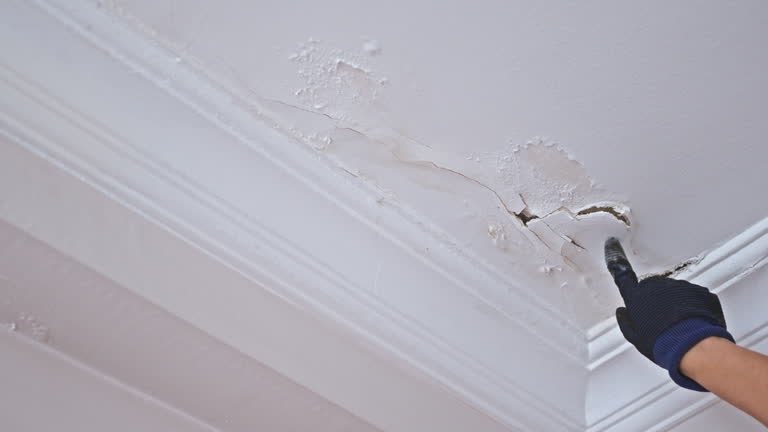
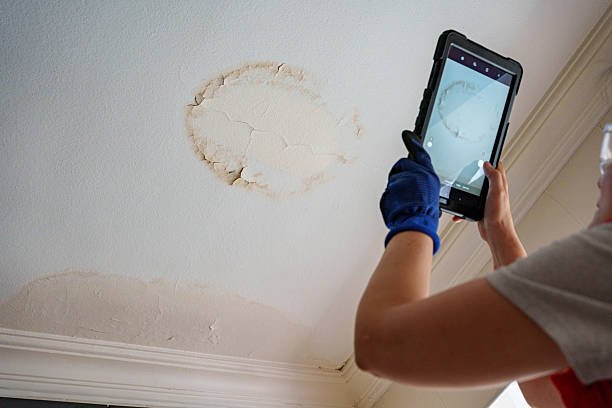
Start inside your home because that’s the safest and easiest place to begin. Grab a strong flashlight, head up to the attic if you have one, and look for dark water stains on the rafters, insulation, or roof decking. These stains often look like rusty lines or wet patches that point you toward the entry point. Poke around gently with a screwdriver if needed to check for soft spots in the wood, but don’t go poking holes everywhere. If there’s no attic access, check ceilings and walls for discoloration, bubbling paint, or that musty smell that screams moisture. Take photos of everything with your phone including dates and notes about when the rain happened. This documentation helps later if you need to file an insurance claim.
Once you’ve narrowed it down indoors, head outside on a dry day. Walk around the house and look up at the roof from multiple angles. Scan for missing or cracked shingles, especially on the windward side where storms hit hardest. Check areas around chimneys, skylights, vents, and where two roof sections meet in a valley. These are classic trouble spots because flashing and seals wear out faster there. Use binoculars if your roof is high so you don’t have to climb yet. Look for granules missing from asphalt shingles. That’s a sign they’re aging and losing their waterproofing. On metal roofs watch for rust spots or loose seams. Tile roofs often leak where individual pieces have shifted or cracked from hail or foot traffic.
The smartest part of this basic is tracing the path backward. Water always flows downhill, so if you see a stain in the attic near the middle of the house, the leak might actually be higher up near the ridge. Mark the spot inside with tape or a marker right under the suspected area, then go outside and measure over to find the exact corresponding spot on the roof. This detective work saves hours of trial and error. In one case I dealt with, the leak was coming from a loose flashing around a bathroom exhaust vent that was two feet away from where water was dripping in the kitchen below. Without tracing it I would have wasted sealant in the wrong place.
Don’t forget seasonal factors either. In colder climates ice dams in winter can force water under shingles even if everything looks fine in summer. In hot areas, expanding and contracting materials create tiny gaps over time. For flat or low-slope roofs common on garages, ponding water is the usual culprit. Spend at least thirty minutes on this step before touching any tools. Rushing here is what turns small fixes into weekend-long headaches. If you’re not comfortable on a ladder yet or the roof looks steep, stop and call a pro for an inspection. Better safe than sorry with heights.
Once you’ve located the source, the second smart basic kicks in. This one is about getting your hands on the right tools and protecting yourself so the repair doesn’t become a bigger problem than the leak. Beginners often skip this and end up frustrated when their cheap ladder slips or they realize they don’t have the right sealant for their roof type. I did that once and ended up buying extra stuff mid-project while standing on a wet roof. Not fun.
Start with safety gear because a fall from even ten feet can change your life. You’ll want a sturdy extension ladder rated for your weight plus tools. Place it on firm ground, angle it properly so the base is one foot out for every four feet of height, and secure the top if possible. Wear non-slip rubber-soled shoes with good tread. A hard hat is cheap insurance against falling debris. Gloves protect your hands from sharp edges and sticky sealants. Safety goggles keep roofing cement out of your eyes. If your roof is steeper than a gentle slope or two stories high, seriously consider a harness and anchor point. Many big hardware stores rent them now for under twenty bucks a day.
For tools, keep it basic but complete. A flat pry bar or roofing shovel to lift shingles without tearing them. A hammer for nails. Utility knife for cutting patches. Caulking gun for sealants. Broom or leaf blower to clean debris. Bucket for mixing or carrying materials. Flashlight for shady spots. Measuring tape because guessing sizes leads to wasted patches. That’s the core kit and it fits in a five-gallon bucket for easy carrying up the ladder.
Materials depend on your roof but focus on quality over cheap stuff. For asphalt shingle roofs, which most homes have, get matching replacement shingles from your local supplier. They’ll often sell single pieces if you bring a sample. Roofing cement or sealant in a tube that matches your climate. Some are flexible for temperature swings, others are heavier for flat areas. Self-adhesive flashing tape is a game-changer for beginners because it sticks without extra mess. For temporary work, heavy-duty plastic sheeting or a tarp rated for outdoor use. Avoid generic duct tape. It fails fast in sun and rain.
Budget-wise you’re looking at maybe fifty to a hundred dollars for a basic repair kit if you don’t already own tools. Compare that to a pro visit starting at three or four hundred and you see why learning this pays off. Store everything in a dry place between uses so it doesn’t go bad. I keep my sealants in the garage and check expiration dates every spring.
The real smart move here is testing your setup on the ground first. Practice lifting a shingle with the pry bar on a scrap piece. Walk around your yard with the ladder to get comfortable. Check the weather forecast obsessively. Never work on a wet roof, in wind over twenty miles an hour, or when lightning is possible. Even pros wait for perfect conditions. If you’re new to heights, have a friend on the ground spotting you and ready to call for help. This basic isn’t glamorous but it keeps you out of trouble and makes the actual fixing part way less stressful.
Now that you’re equipped and safe, the third smart basic focuses on quick temporary fixes that buy you time until you can do a proper job or the weather clears. These aren’t permanent but they’re lifesavers when rain is forecast and you can’t get on the roof immediately. The goal is containment, not perfection. I once used a tarp setup that held for three weeks while waiting for shingles to arrive in the right color. It kept the interior bone dry and saved my drywall.
First step inside the house: contain the water. Place buckets or plastic bins directly under the drip. If the ceiling is bulging, carefully poke a small hole with a screwdriver to let water drain slowly into the bucket instead of crashing down all at once. Cover furniture with plastic sheeting and move electronics out of the way. This gives you breathing room.
Outside, the tarp method is king for larger areas. Use a heavy polyethylene tarp at least six mil thick. Cut it big enough to cover the damaged section plus at least four feet extra on all sides so water can’t sneak underneath. Lay it over the roof, smooth out wrinkles, and secure the edges with wood boards or sandbags. Screw the boards lightly into the roof if needed but avoid over-penetrating good shingles. For smaller leaks, roofing tape or patches work wonders. Clean the area first with a brush to remove loose granules or dirt. Cut a piece of tape larger than the hole, peel the backing, and press it down firmly. Roll over it with a small roller or your gloved hand for good contact. Top with a dab of roofing cement around the edges for extra insurance.
For flashing problems, a temporary seal can be made with flexible sealant squeezed into gaps after cleaning. On metal roofs, magnetic patches or special tapes designed for steel hold surprisingly well short-term. The key with any temporary fix is checking it after the next rain. Walk around and look for new drips or loose edges. Adjust as needed. These fixes typically last from a few days to a couple months depending on how well you install them and what the weather throws at you.
One mistake beginners make is using household items like plastic bags or old tarps from the garage. They tear or blow away in the first decent wind. Spend the little extra on proper materials. Another tip: take photos before and after so you remember exactly how you set it up. When the sun comes out and it’s time for permanent work, removing a well-secured tarp is much easier than dealing with a soggy mess.
This basic teaches patience. It’s tempting to rush into permanent repairs when you’re stressed about water damage, but sometimes waiting for dry conditions or the right materials prevents bigger mistakes. Use the temporary phase to order parts, watch tutorial videos specific to your roof type, and double-check your insurance coverage. Many policies cover sudden leaks from storms but not neglect. Documenting everything now helps later.
With the leak contained, you’re ready for the fourth smart basic: hands-on permanent repairs for the most common problems. This is where you actually fix things so they stay fixed. We’ll focus on the top issues beginners encounter because trying to tackle everything at once overwhelms most people. Start small and build confidence.
For damaged or missing asphalt shingles, which cause probably half of all leaks, the process is straightforward. On a dry day, climb up and locate the bad shingle. Use your pry bar to gently lift the tabs of the shingles above it. This exposes the nails holding the damaged one. Remove those nails carefully without tearing surrounding material. Slide out the old shingle. Slide in a new one aligned perfectly with the course. Nail it down using four roofing nails just below the glue strip area. Then dab roofing cement under the lifted tabs above and press them back down. That’s it. The whole job takes maybe twenty minutes once you’re practiced.
Flashing leaks around chimneys or vents need a different approach. Clean the area thoroughly. If the flashing is rusted or loose, remove loose pieces and replace with new step flashing or counterflashing cut to fit. Overlap pieces properly like shingles so water sheds away. Seal all edges and nail heads with generous but not excessive roofing cement. Too much cement can trap moisture later. For small gaps, modern polymer sealants that stay flexible work better than old-school tar because they handle expansion without cracking.
Valleys where two roof planes meet collect water like a funnel. If sealant there has failed, clean out debris and reapply a thick bead of valley-specific sealant or install new valley metal if it’s badly corroded. Ice dam problems in winter-prone areas require addressing the root cause. Clear gutters first, then consider heat cables for prevention, but for immediate repair, remove the ice carefully with a steamer or wait for thaw and reseal under shingles.
On metal roofs, focus on seams and penetrations. Special metal-compatible tapes and sealants are available now that bond permanently without rusting. Tile roofs are trickier for beginners because broken tiles need matching replacements from the manufacturer. Lift surrounding tiles, replace the broken one, and reseal with mortar or clips as original. If your roof is slate or wood shake, honestly consider calling a specialist unless the damage is tiny.
Throughout the repair, work from the bottom up so you don’t damage what you’ve already fixed. Check your work by spraying the area lightly with a hose after everything dries. Look for leaks from below. If water still comes in, go back and add more sealant. Common mistakes include nailing too high on shingles which creates new holes, using the wrong color or type of material that stands out like a sore thumb, or skipping the cleaning step so nothing sticks. Take your time. A repair done right lasts years instead of months.
The fifth and final smart basic is prevention and maintenance that stops leaks before they happen. This is the part most beginners ignore until the next problem shows up, but it’s truly the smartest long-term play. A little effort every season keeps your roof healthy and your wallet happy.
Create a simple inspection schedule. Twice a year, once in spring and once in fall, walk around the house and look at the roof from the ground. Use binoculars or a drone if you have one for closer views without climbing. Clear gutters and downspouts of leaves and debris because backups force water under shingles. Trim tree branches that scrape the roof in wind. Check for new missing granules or curled shingles. Inside the attic, keep an eye on insulation for any dampness even if no active leak exists.
For ongoing protection, consider applying a roof coating every few years on flat or aging roofs. These liquid rubber or acrylic products create an extra waterproof layer without replacing everything. They’re easy to roll on with a paint roller and extend life significantly. Seal any new penetrations immediately when you add satellite dishes or vents. Use proper flashing kits instead of caulk alone.
Monitor your roof’s age. Asphalt shingles typically last twenty to thirty years. If yours are approaching that, budget for a full inspection by a pro every other year. They can spot issues you might miss like deck rot. Keep records of every repair including dates, materials used, and photos. This history helps when selling the house or dealing with insurance.
Small habits make a huge difference too. During storms, note where water seems to pool on the roof. Address low spots with better drainage. In snowy areas, remove snow carefully from the eaves to prevent ice dams. Never walk on the roof more than necessary. Each footstep wears down granules and creates weak points.
If you follow these five basics consistently, you’ll handle most leaks like a seasoned homeowner instead of panicking every time it rains. The process becomes almost routine after your first success. You’ll save money, protect your investment, and gain that satisfying feeling of fixing something yourself.
Of course, not every situation fits a DIY approach. If the roof is over twenty-five years old, shows widespread damage, or involves complex materials like slate or certain metal systems, bring in professionals early. Same if you’re uncomfortable with heights or the leak involves electrical components near the roof. Safety and common sense always trump saving a few bucks.
Looking back at my own experiences, the leaks that caused the most trouble were the ones I ignored or patched poorly out of impatience. The ones I handled following these basics? They disappeared and never returned. Your home deserves that kind of care. Start small, stay consistent, and before long you’ll wonder why you ever stressed about a little drip in the first place.
Keep a basic repair kit ready in the garage. Check your roof regularly like you check the oil in your car. Act fast when you spot trouble. These aren’t complicated rules but they work year after year in real homes across different climates. If water damage has already started inside, focus first on drying things out with fans and dehumidifiers while you address the roof. Mold grows fast so don’t delay that part either.
One last thought from someone who’s been through it. Roof leaks have a way of showing up at the worst times, like right before a holiday or during a busy work week. Having these basics in your back pocket turns a potential disaster into a manageable weekend project. You might even find yourself helping neighbors once word gets around that you know what you’re doing. That’s the best part of learning this stuff. It spreads and makes everyone’s homes a little safer.
Take these five smart basics, adapt them to your specific roof and situation, and you’ll be set. No fancy degrees or expensive certifications required. Just a willingness to learn, stay safe, and do the work step by step. Your roof will thank you, your ceiling will stay dry, and you’ll sleep better through every storm that rolls in.