3 Quick Roof Leak Fix Guide Maintenance Checks That Stop Leaks
Meta Description: 3 Quick Roof Leak Fix Guide maintenance checks help homeowners stop leaks fast before small drips turn into expensive water damage. Protect your house, take action now.
3 Quick Roof Leak Fix Guide: Maintenance Checks That Stop Leaks Before They Destroy Your Home
A little drip from your ceiling can quickly become a nightmare.
One week it’s a tiny stain. The next week you have soggy insulation, warped drywall and a repair invoice that sends your stomach to the floor.
The good news? Most roof leaks don’t happen overnight. They build gradually — and that gives you time to catch them.
This guide provides a complete roof leak fix checklist around practical maintenance inspections that work. You don’t have to be a contractor. You don’t need fancy tools. You just have to know where to look and what to do if you discover an issue.
Let’s get into it.
Why Roof Leaks Are More Devious Than You Realize
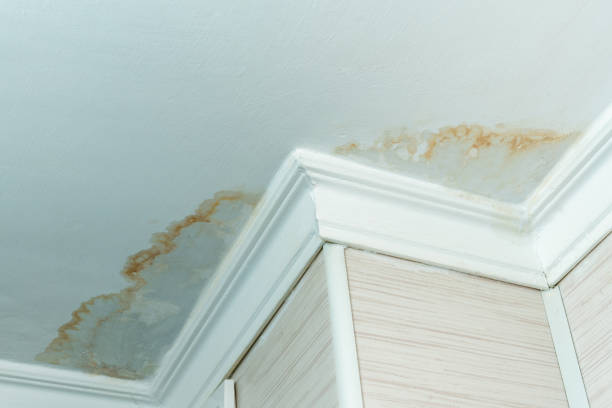
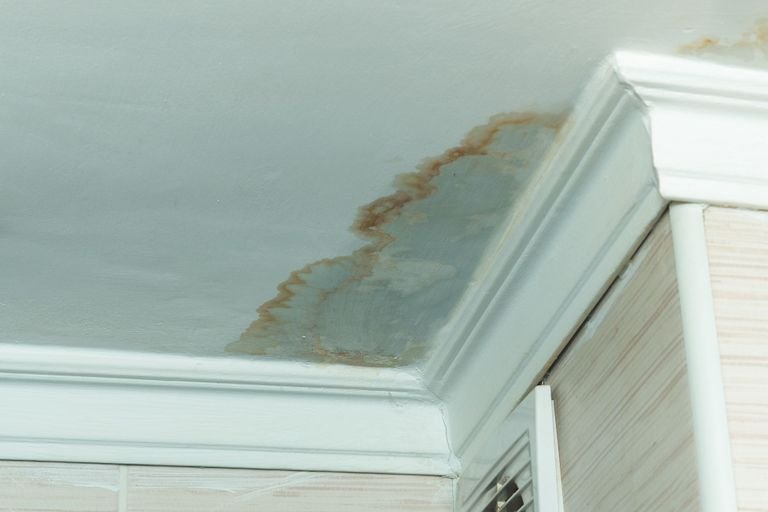
Most people don’t know their roof is leaking until they see water inside the house. By then, it’s too late.
The thing is, water moves. It doesn’t drip directly down from the hole in your roof. It runs along rafters, pools on top of insulation and then finds the lowest point before dripping down onto your ceiling. That wet spot in your living room? The real leak could be on your roof, 10 feet away.
This is the reason why routine maintenance checks work so effectively. You discover problems at the source — not after water has already rotted away your home.
What Causes Most Roof Leaks?
Before you can fix a leak, you need to know what causes them. Here are the usual suspects:
| Cause | Commonality | Risk Level |
|---|---|---|
| Damaged or missing shingles | Very common | High |
| Cracked flashing around chimney/vents | Very common | High |
| Clogged gutters | Common | Medium |
| Worn-out pipe boot seals | Common | High |
| Improper attic ventilation | Less common | Medium |
| Ice dams (cold climates) | Seasonal | High |
| Cracked roof valleys | Common | High |
Many of these are preventable problems. And they all have early warning signs — if you know where to look.
The 3 Quick Roof Leak Fix Guide: Your Step-by-Step Maintenance Plan
This guide is segmented into three primary maintenance checks. Each one works on a different aspect of your roof system. Combined, they address the primary leak entry points for any household.
It’s like a health checkup — for your roof.
Check #1 — Take a Look at Your Shingles, Flashing, and Roof Surface
This is the big one. Your roof surface is your home’s primary defense system against rain, snow and wind. When something goes wrong up there, water gets in.
You do not need to get on the roof to perform this check. In fact, inexperienced walking on your roof can further escalate the damage. Begin at ground level with binoculars, or use a ladder to view the roof edge safely.
What to Look for on Your Shingles
Shingles get hammered day in and day out. They warp, curl, blister or simply disappear. Here’s what to watch for:
Curling edges: Shingles that start to curl up at their corners or along the edge are no longer sealing effectively. Water can slip underneath easily.
Cracked or broken shingles: A shingle that is cracked down the center is a direct entry point for rain.
Missing shingles: Wind sometimes simply tears them off. A bare patch on your roof is a serious problem that must be fixed immediately.
Granule loss: If you notice small, sand-like granules building up in your gutters, it may be a sign that your shingles are wearing out. This indicates the waterproofing layer is deteriorating.
Dark stains or moss growth: Green or black patches on your roof can hold moisture and eat away the material underneath over time.
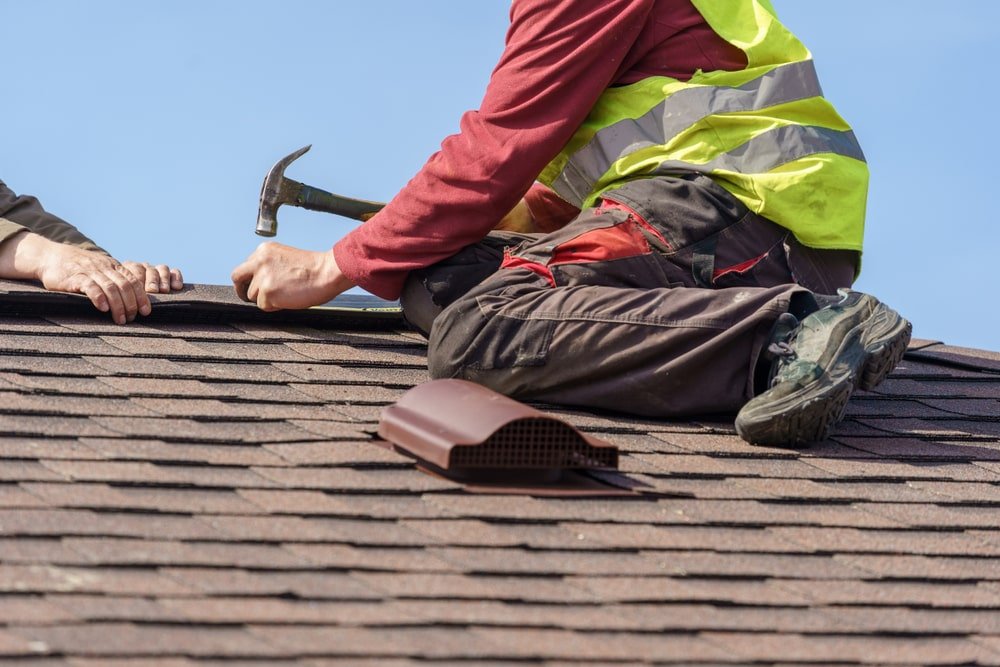
How to Repair Minor Shingle Damage
This is an easy DIY fix for one or two damaged shingles.
What you’ll need:
- New shingles (color and type must match)
- Roofing nails
- Roofing cement or sealant
- Pry bar
- Hammer
Steps:
- Pry up the edges of adjacent shingles with a pry bar.
- Take out the nails that hold the affected shingle.
- Slide out the damaged shingle.
- Work the new shingle into position.
- Tack it down with roofing nails (four nails per shingle).
- Press down the surrounding shingles and seal the edges with roofing cement.
For more extensive damage, contact a licensed roofer. A few hundred dollars now beats a complete roof replacement later.
Examine Your Flashing — The Most Common Leak Location
Flashing is the thin sheet metal installed around chimneys, skylights, vents and roof valleys. Its role is to fill the space between various surfaces.
When flashing cracks, separates or rusts, water goes right in.
This is actually the number one cause of leaks in older homes. The shingles are fine — but the flashing has silently surrendered.
Inspect these flashing areas every season:
- Around your chimney — Check for rust, gaps or cracked caulk.
- Around skylights — Make sure the metal is still pressed flat and the sealant isn’t cracking.
- Where the roof meets a wall — This step flashing is often missed.
- In roof valleys — These are the V-shaped grooves formed where two sections of a roof slope converge. They carry heavy water flow and have to be watertight.
Quick fix for flashing leaks:
If the flashing is still structurally sound but has only a tiny crack or gap, roofing sealant or caulk can be used to close it. Make sure to use an outdoor- and high-temperature-rated product.
If the flashing is bent, rusted through or separated from the surface, it should be replaced. If you’re not comfortable with heights or cutting metal, this is a good job for a professional.
Pro Tip: Check your roof surface twice a year — once in the spring after winter weather, and again in the fall before rain and snow season hits.
Check #2 — Remove Debris From Gutters and Downspouts
This may be the least difficult check on this list — and the most overlooked.
One of the most common reasons for roof leaks and water damage is clogged gutters. When gutters are clogged with leaves, twigs and debris, rainwater has nowhere to go. It backs up, pools against the edge of your roof and slowly seeps in.
Why Gutters Matter More Than Most People Think
Your gutter system works to drain water away from your roof and away from your foundation. When it fails, water collects where it ought not be at all.
Here’s what happens when gutters get clogged:
- Water pools beneath the shingles at the roof edge.
- The wood decking (the layer underneath your shingles) becomes wet and begins to rot.
- Water leaks down into the attic and later through the ceiling.
- In cold climates, backed-up water freezes and creates ice dams that drive water under shingles.
All this can be avoided with one simple task: clean your gutters.
The Right Way to Clean Your Gutters
You will need a ladder, gloves, a bucket or tarp, and a garden hose.
Step-by-step process:
- Place your ladder on flat ground as safely as possible.
- Wear gloves — gutters hold all sorts of nasty stuff.
- Manually remove or use a gutter scoop to clear out leaves, twigs and debris.
- Work in sections, dropping debris into a bucket or onto a tarp.
- After clearing the debris, flush out the gutter with a garden hose, working toward the downspout.
- Make sure water drains easily through the downspout. If blocked, use a plumber’s snake or high-pressure water to unclog it.
How often should you clean your gutters?
| Climate/Environment | Recommended Frequency |
|---|---|
| Heavy tree coverage | Every 2–3 months |
| Moderate trees nearby | Twice a year (spring & fall) |
| Few or no trees | Once a year |
| After major storms | Immediately after |
Check for Gutter Damage While You’re Up There
As you clean, check for these problems:
- Sagging sections — Gutters should slope slightly toward the downspout. If they sag or pull away from the house, water will collect inside.
- Holes or rust spots — Small holes can be repaired with gutter sealant. Larger damage means replacement.
- Separated joints — When gutter sections join together, they can separate over time. Reseal them with gutter caulk.
- Downspout placement — Ensure your downspout sends water 4–6 feet from your home’s foundation.
Consider Installing Gutter Guards
If you’re tired of cleaning gutters every couple of months, gutter guards can help. They’re mesh or foam covers that allow water in but block debris.
They’re not perfect — you’ll still have to do some maintenance every so often — but they greatly reduce your cleaning frequency.
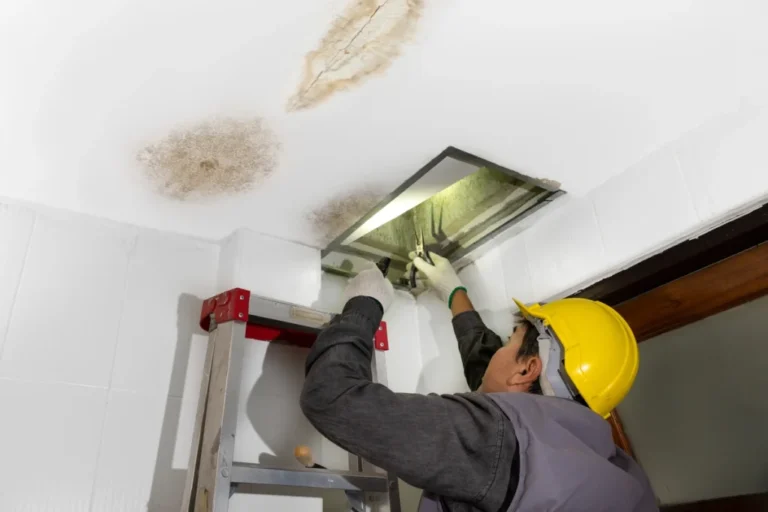
Check #3 — Look for Hidden Leak Damage in Your Attic
Most homeowners go into their attic very infrequently. That’s a mistake.
Roof leaks will show up first in your attic. Before water makes it to your ceiling, it is often sitting in your attic — soaking insulation, developing mold and rotting wood.
Catching a leak in the attic is already a big win. It means you caught the issue early, before it resulted in significant structural damage.
What to Bring for Your Attic Inspection
- A flashlight or headlamp
- A dust mask (attics can be dusty or moldy)
- Clothes you don’t mind getting dirty
- Something to take notes or pictures with
What to Look for in Your Attic
Water stains on rafters or sheathing: Brown or yellowish streaks in the wood indicate water has traveled through at some point. Trace the stains upward to see where the water is coming in.
Damp or compressed insulation: Healthy insulation should be fluffy and dry. If it’s wet, matted down or smells musty, water has been entering.
Mold or mildew: Black, green or white fuzzy growth on wood or insulation means moisture has been sitting there for some time. This is a health hazard and requires urgent attention.
Light streaming through your roof: If light can get through the boards over your head, then water can enter that way as well.
Winter frost buildup: In cold climates, frost inside the attic is a sign of insufficient ventilation or a moisture problem.
Tracking Down the Actual Source of the Leak
Here’s how to trace water damage back to the source once you spot it in the attic:
- Find the highest point of the water stain or wet area.
- Run your flashlight along the rafters and decking above.
- Search for dark patches, areas of moisture, or places where the wood appears discolored.
- Sometimes you can actually see the drip in real time during or just after rain.
- Mark the area with chalk so you can identify it from outside on the roof.
Don’t Forget Attic Ventilation
Moisture buildup can occur even without an active roof leak due to poor attic ventilation.
When warm, moist air from inside your home rises into the attic and cannot escape, it condenses on the cold wood and insulation. Over time, this causes the same kind of damage as a roof leak — rot, mold and structural failure.
Signs of poor ventilation:
- Formation of ice dams at the edges of roofs in winter
- Hot attic in summer (above 130°F)
- Mold growing with no clear source of a leak
- Peeling paint on exterior walls near the roofline
According to the U.S. Department of Energy, proper attic insulation and ventilation can significantly reduce moisture damage and improve overall home energy efficiency.
Make sure your attic has both intake vents (at the soffits) and exhaust vents (at the ridge or close to the peak). If you aren’t certain, have an inspector check it out.
Seasonal Maintenance Schedule — When to Do Each Check
Staying on schedule is what makes a homeowner who discovers leaks early different from one who is blindsided by a $10,000 repair bill.
| Season | What to Check |
|---|---|
| Spring | Shingles, flashing, gutters (post-winter damage), attic for moisture |
| Summer | Gutters (after storm season), check roof for moss/algae growth |
| Fall | Full gutter cleanout, full shingle inspection before rain season, attic check |
| Winter | Watch for ice dams, frost buildup in attic, inspect after heavy snow |
When to Call a Professional Roofer
Some issues are larger than a weekend DIY job. Here’s when to bring in the pros:
- The leak is widespread — If water spotting spreads over more than a few square feet, the damage may be extensive.
- You observe structural sagging — A drooping roofline indicates that the decking or supports are failing.
- Widespread mold — Large mold infestations can’t simply be patched up; they require professional remediation.
- You’re not comfortable on a roof — Falls from roofs are one of the most common causes of serious DIY injuries at home. Safety comes first.
- Several flashing areas are failing — Flashing replacement throughout a whole roof is a specialized job.
- Your roof is over 20 years old — At that point, patch repairs might no longer be enough. A full assessment is worth it.
A good rule of thumb: if the repair requires replacing more than a few shingles or a small area of sealant, obtain at least two professional quotes before making a decision.
Quick Reference: Roof Leak Prevention Checklist
Use this checklist every season to make sure you stay ahead of leaks:
Roof Surface:
- ✅ Look for missing, cracked or curling shingles
- ✅ Inspect all flashing for cracks, gaps or rust
- ✅ Check for moss, algae or dark staining
- ✅ Inspect roof valleys for signs of wear or damage
Gutters:
- ✅ Clean out all debris from gutters and downspouts
- ✅ Look for sagging, holes or separated joints
- ✅ Verify that downspouts drain water away from foundation
- ✅ Make sure gutter hangers and fasteners are secure
Attic:
- ✅ Check for water stains or wet wood
- ✅ Inspect insulation for dampness or compression
- ✅ Check for mold or mildew growth
- ✅ Verify that airflow is working properly
- ✅ Look for light shining through roof boards
FAQs About Roof Leak Repairs and Maintenance
Q: How can I locate a roof leak if I can’t see where it’s coming from?
Begin in your attic during or shortly after rain. Bring a flashlight and look for active drips or wet spots on the wood. If it’s dry outside, search for water stains and follow them upward to the roof surface. The stain usually brings you to within a few feet of the entry point.
Q: Can I repair a roof leak myself, or do I always need a roofer?
Minor repairs — such as replacing one or two shingles, resealing cracked flashing or patching a small hole — are generally DIY-friendly if you’re comfortable on a ladder and have the proper materials. Larger issues, such as widespread shingle damage, sagging rooflines or full flashing replacement, are best left to the professionals.
Q: How long does roofing sealant last?
Most roofing caulk and sealant has a lifespan of 5–10 years, depending on the product, climate exposure, and how well it was applied. Inspect sealed areas every year and reapply if you see cracking or separation.
Q: When is the best time to inspect my roof?
Spring and fall are ideal times. Spring allows you to evaluate any damage from winter storms and ice. Fall gives you the chance to fix issues before heavy rain and snow season kicks in. After any big storm, a quick check is always a good idea.
Q: How much does it cost to fix a roof leak professionally?
Minor repairs such as sealing flashing or replacing a few shingles usually cost $150 to $500. Larger repairs involving water damage, replacing decking or major flashing work can cost from $500 to $3,000 or more. A complete roof replacement ranges from $8,000 to $15,000 depending on the size and type of roof.
Q: How can I determine whether my roof needs a repair or a complete replacement?
If your roof is less than 15 years old and the damage affects only a small area, repair is typically the way to go. If your roof is over 20 years old, if there’s damage in more than one area, or the cost of all repairs is greater than 30–40% of the cost of a new roof, then replacement is typically the better long-term investment.
Q: Do gutter guards eliminate the need to clean gutters altogether?
No. Gutter guards significantly reduce how often you’ll need to clean, but they’re not a cure-all. Fine debris such as seeds, pine needles and shingle granules can still pass through or accumulate on top. Even with guards in place, plan to inspect and clean at least once each year.
A Little Maintenance Goes a Long Way
Here’s the truth about roof leaks — most are completely avoidable.
The homes that ultimately suffer catastrophic water damage are not always the ones with the oldest roofs. They’re the ones where nobody climbed a ladder in three years. Where the gutters were always “on the list.” Where the attic was a place things got shoved and forgotten.
This 3 quick roof leak fix guide gives you a simple, repeatable system. Check your shingles and flashing. Clean your gutters. Look inside your attic. Do it twice a year, and after every significant storm.
That’s it.
A few hours of maintenance each season can save you tens of thousands of dollars and months of headaches. Your roof is what keeps everything inside your home dry, warm and protected.
Take care of it — and it’ll take care of you.