
6 Powerful Roof Leak Fix Guide Repair Hacks You Should Know
6 powerful roof leak fix guide repair hacks you should know
There’s a particular kind of silence that comes with a leaking roof. It isn’t the absence of sound, but the slow, rhythmic tapping of water where it shouldn’t be—on a ceiling, down a wall, onto a floor that once felt secure. Most people don’t think about their roof until that first drip appears. Then suddenly, it becomes urgent, frustrating, and sometimes overwhelming.
This guide is not just a collection of tips. It’s a grounded, practical walk through real-world roof leak repair—drawn from hands-on scenarios, small mistakes, smart fixes, and the kind of problem-solving that comes from actually being up there, trying to stop water from finding its way inside. You’ll find not just “what to do,” but “why it works,” and more importantly, how to think when things don’t go as planned.
Let’s get into six powerful repair hacks that can make the difference between a temporary patch and a long-lasting solution.
understanding the leak before fixing it
Before you grab tools or climb a ladder, there’s one truth you need to accept: the visible leak is often not where the problem begins. Water travels. It slips under shingles, along beams, across insulation, and finally emerges in a spot that may be several feet away from the actual entry point.
A common mistake is sealing the visible stain on the ceiling or applying patchwork directly above it on the roof. That approach rarely holds. Instead, you need to trace the path backward.
One effective way to do this is during daylight. Go into the attic with a flashlight turned off. If sunlight is peeking through, you’ve found at least one entry point. If that’s not possible, a controlled water test can help—have someone spray sections of the roof while you observe from inside.
This stage isn’t glamorous, but it’s where the real fix begins.
hack 1: the tarp method that actually works
You’ve probably heard of using a tarp as a temporary solution. What most people don’t realize is that a poorly installed tarp can make things worse by trapping water or directing it into new areas.
The key is not just covering the damaged spot but controlling the flow of water.
Start by choosing a tarp that extends at least three feet beyond the damaged area on all sides. Position it so that water flows over it, not under it. This means anchoring the top edge under a row of shingles if possible, rather than simply laying it on top.
Use wooden boards to secure the tarp edges, not just nails. Wrap the tarp around the board and screw the board into the roof. This distributes pressure and reduces tearing during wind.
Think of the tarp as a temporary roof layer, not a blanket. When done right, it can hold up through heavy rain until a permanent fix is possible.
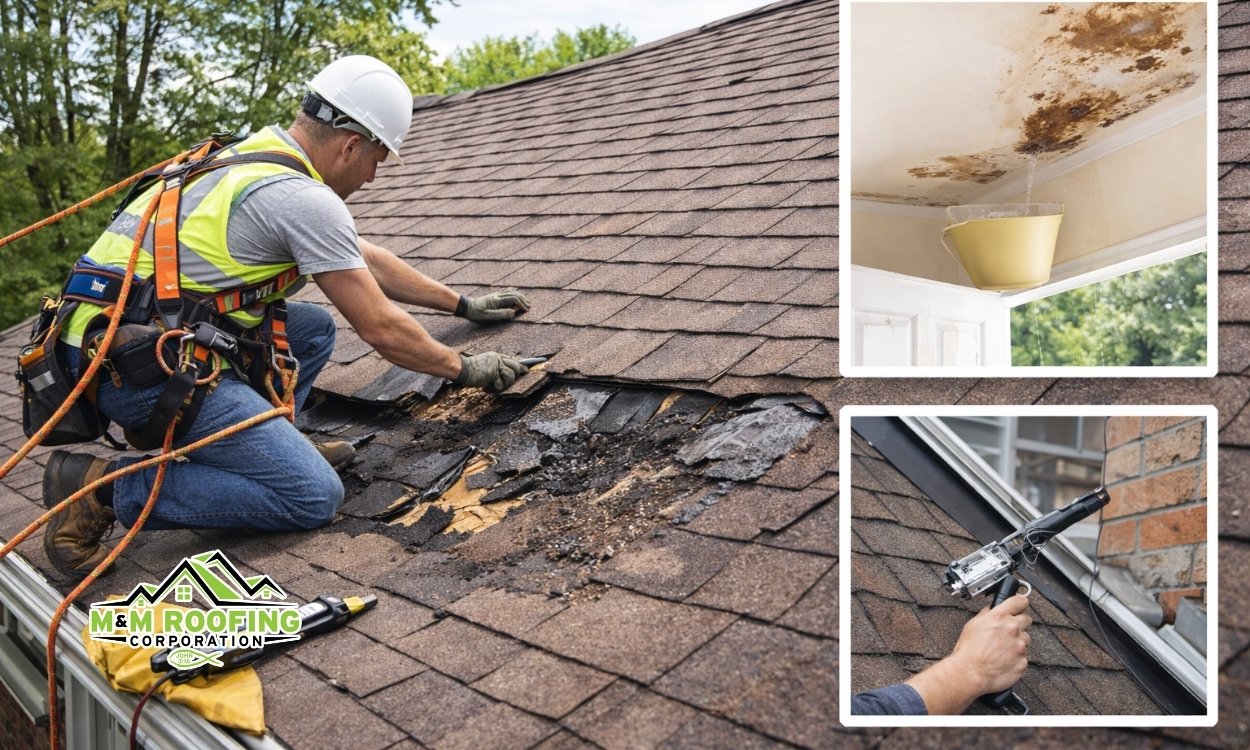
hack 2: sealing flashing the smart way
Flashing is one of the most common failure points in any roofing system. It’s the thin metal installed around chimneys, vents, skylights, and roof valleys. When it fails, leaks follow.
Many people try to fix flashing leaks with excessive amounts of sealant. That’s a short-term fix at best. The smarter approach is to combine mechanical adjustment with proper sealing.
First, inspect the flashing. If it’s loose, bent, or lifted, gently reposition it. Clean the area thoroughly—dirt and moisture will prevent sealants from bonding properly.
Instead of slathering sealant everywhere, apply it precisely along seams and edges. Use a roofing-specific sealant that remains flexible over time.
If the flashing is severely damaged, consider replacing that section entirely. It’s often a relatively small job that prevents repeated issues.
hack 3: replacing shingles without tearing up the roof
Damaged or missing shingles are obvious culprits, but replacing them can be intimidating if you’re worried about causing more harm.
The trick lies in patience and the right sequence.
Lift the edges of the surrounding shingles carefully. You’ll likely find nails holding the damaged shingle in place. Remove these nails without damaging adjacent materials.
Slide the new shingle into place and secure it with nails in the same pattern. Then, apply a small amount of roofing adhesive under the edges of overlapping shingles to reseal them.
Avoid over-nailing or placing nails too close to edges. That’s a common error that leads to new leaks.
Working slowly here pays off. A properly replaced shingle should blend seamlessly and function just like the original.
hack 4: the hidden power of roof cement
Roof cement often gets a bad reputation because it’s misused. When applied correctly, it’s one of the most effective tools in your repair kit.
The mistake is treating it like glue rather than a sealing compound.
Use roof cement to fill small cracks, seal nail heads, and reinforce vulnerable joints. Apply it with a putty knife, pressing it into gaps rather than just spreading it on the surface.
For added durability, embed a small piece of roofing fabric into the cement and cover it with another layer. This creates a reinforced patch that resists cracking.
Think of roof cement as a targeted solution, not a universal fix. When used strategically, it can extend the life of your roof significantly.
hack 5: fixing leaks from inside when you have no choice
Sometimes, getting onto the roof isn’t immediately possible—maybe it’s raining, or conditions are unsafe. In these cases, an interior fix can buy you time.
This isn’t a permanent solution, but it can prevent damage from spreading.
Locate the point where water is entering inside. Use a container to catch drips and relieve pressure. Then, if possible, create a small drainage path by puncturing the lowest point of a water bulge in the ceiling. It may sound counterintuitive, but controlled drainage is better than uncontrolled collapse.
In the attic, you can apply temporary patches using plastic sheeting and sealant to divert water. The goal is to guide it away from critical areas until you can address the issue from the outside.
This approach requires careful handling but can prevent major interior damage.
hack 6: preventing future leaks while fixing the current one
The best repair isn’t just about stopping the current leak—it’s about ensuring you don’t face the same problem again.
Take a moment to inspect the surrounding area. Are there signs of wear on nearby shingles? Is debris collecting in valleys? Are gutters clogged?
Often, leaks are symptoms of broader issues.
Clean gutters to ensure proper drainage. Trim overhanging branches that may damage shingles during storms. Check for signs of moss or algae growth, which can trap moisture.
Consider applying a waterproof underlayment or sealant in vulnerable areas. Small preventive steps can save you from major repairs down the line.
practical scenarios and lessons learned
Imagine climbing onto a roof after a storm and finding a single missing shingle. It’s tempting to think that’s the only problem. But beneath it, you might discover weakened underlayment or moisture damage that has been building for months.
Or consider a slow leak near a chimney. You might seal it once, only to find it returning after the next rain. The real issue could be improperly installed flashing that needs repositioning, not just sealing.
These situations highlight a key idea: roof repair is as much about observation as it is about action.
tools that make a real difference
You don’t need a massive toolkit, but a few reliable items can make the process smoother:
A sturdy ladder with proper support
A pry bar for lifting shingles
Roofing nails and a hammer
Sealant designed for roofing applications
A utility knife for precise cuts
Safety gear, including gloves and non-slip shoes
Investing in quality tools isn’t about convenience—it’s about control. When you have the right equipment, you’re less likely to rush or make mistakes.

common mistakes to avoid
One of the biggest errors is rushing the repair. Water damage creates urgency, but quick fixes often lead to repeat problems.
Another mistake is ignoring safety. Roof work can be dangerous, especially on steep or wet surfaces. If conditions aren’t safe, wait or seek professional help.
Overusing sealants is also a common issue. More isn’t always better. Precise application is far more effective than excessive coverage.
Finally, don’t overlook the importance of inspection. Fixing what you see without understanding the underlying cause is a recipe for frustration.
thinking like a problem solver
Roof repair isn’t just about following steps—it’s about adapting to what you find. Every roof is different. Materials vary, weather conditions change, and no two leaks behave exactly the same way.
Approach each repair with curiosity. Ask yourself where the water is coming from, how it’s moving, and what conditions allowed it to enter.
This mindset turns a stressful situation into a manageable challenge.
when to call a professional
There are times when DIY repairs aren’t the best option. Extensive damage, structural issues, or leaks that persist despite multiple attempts may require professional expertise.
Knowing your limits isn’t a weakness—it’s part of effective problem-solving.
A skilled roofer can identify issues that aren’t immediately visible and provide solutions that go beyond temporary fixes.
faqs
- how do i know if a roof leak is serious
A leak is serious if it’s persistent, spreads quickly, or affects structural elements like beams and insulation. Even small leaks can become major problems if left untreated. - can i fix a roof leak myself without experience
Yes, many minor leaks can be fixed with basic tools and careful attention. However, safety and proper diagnosis are crucial. If you’re unsure, start with temporary solutions and assess the situation. - how long do temporary fixes like tarps last
A properly installed tarp can last several weeks to a few months, depending on weather conditions. It’s meant to buy time, not replace a permanent repair. - what is the most common cause of roof leaks
Damaged shingles, faulty flashing, and clogged gutters are among the most common causes. Regular maintenance can prevent many of these issues. - should i repair or replace my roof if it leaks
It depends on the extent of the damage. Isolated leaks can often be repaired, but widespread issues or an aging roof may require replacement. - is roof cement a permanent solution
Roof cement can be long-lasting when used correctly, but it’s best suited for small repairs and reinforcement rather than large-scale fixes.
closing thoughts
Fixing a roof leak isn’t just about stopping water—it’s about restoring a sense of control over your space. It’s the difference between reacting to damage and actively protecting your home.
The hacks shared here aren’t shortcuts. They’re practical approaches shaped by real challenges and real solutions. When you combine careful observation, the right tools, and a willingness to learn, even a daunting leak becomes something you can handle.
And the next time you hear that faint drip, you won’t just react—you’ll know exactly what to do.


